Chic Handmade Jewelry Ideas To Sell
 Posted by Shu Wen
Saturday 15 Dec 2018
Posted by Shu Wen
Saturday 15 Dec 2018
Share
Handmade jewelry is a favorite product to sell online and at craft fairs and as one of the top pick category for handmade products. This is a great niche or category to begin with as a beginner as you are able to come up with amazing pieces with fairly low costs.
It may be truly overwhelming whenever you initially decide on which type of jewelry you want to work on since there is such an extensive range of options! Definitely you wouldn't be able to learn the various skills like crochet, knit, hand sew, quilt, and embroider all at one time, it is impractical to attempt to deal with every jewelry type making especially when you just started hands on in this area. Rather, pick one kind you would want making for starters and go from there.
Possibly you like using beaded jewelry best, or perhaps you wish to work with natural leather, glass or clay. Pick one medium to concentrate on first. If you have acquired the skills in making the same jewelry type and hoping to get some inspiration to work on this season, read on to find out more!
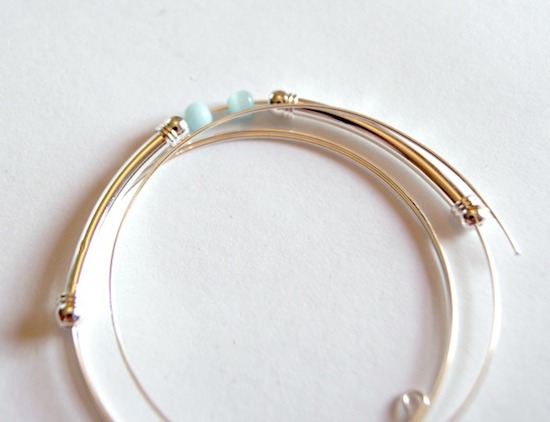
1. Memory Wire Beaded Bracelet
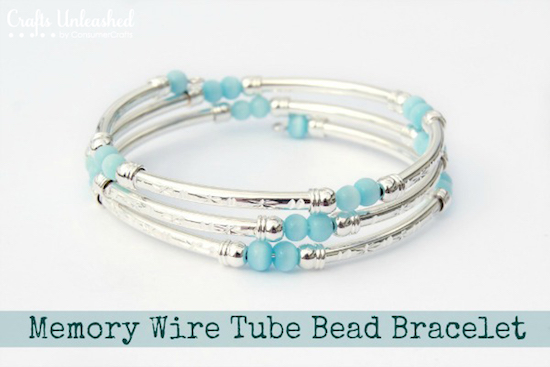
Source: Consumer Crafts
This is an enjoyable project as well as simple bangle ideal for handmade jewelry beginners to start with. It utilizes memory wire as the main material, so there aren't any clasps or maybe findings to be concerned about. All that you need to play around and be creative with is the kind of amazing beads you wish to work with!
A little bit about memory wire
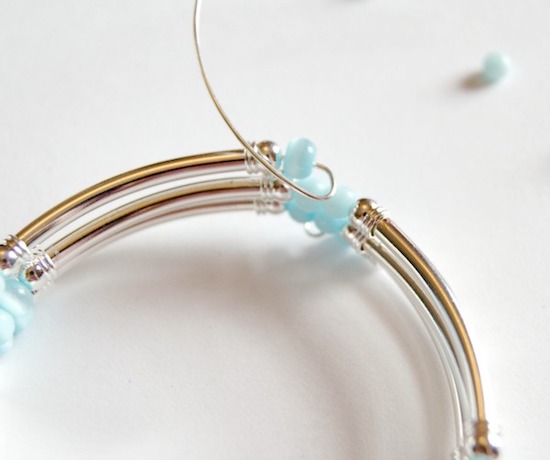
Memory wire is a stainless steel wire and appears to be one of the simplest stringing material to use in making jewelry. With its hard and strong characteristic, memory wire keeps in shape and it is extremely tough to unbend, therefore it is incredibly ideal for making a bracelet or necklace which is intended to wrap around the wrist or the neck of yours. Since it is a strong material, it is recommended to use specialised memory wire cutter to prevent damage to your regular cutter or scissors.
Materials you need:
- memory wire
- tube beads (3 packs of 4)
- Accent beads of your choice (using a few inches of 4mm round Turquoise Shell Twister Beads)
- Round nosed jewelry pliers
- Memory wire shears (optional but helpful)

Steps:
1. Firstly, form a little loop at the end of the memory wire coil with the round nosed pliers. This would hold the beads as you work. In case you're working on a big spool, you are able to cut approximately four coils off to create this particular bracelet.
2. Start threading the beads into the coil. There's no wrong or right way to do it. For this, 2 shell beads is added in between each tube bead. You may use only one, or perhaps many!
TIPS: When you discover that the tube beads are not precisely the same curve as the memory wire of yours, you might have to bend or unbend the memory wire somewhat to complement the curve. You'll just have to to this at the very start of the coil. After the putting the beads, they are going to slide along fine.
3. When all the beads are actually threaded on, using the round nosed pliers and create a curve at the end of the memory wire. This helps to make sure that the beads do not fall off when you nip off of the surplus wire with the shears.
4. Finish off by creating a loop at the end of the newly cut wire, so that is it! It is all set to use, sell or even as a gift!
2. Polymer Clay Necklace
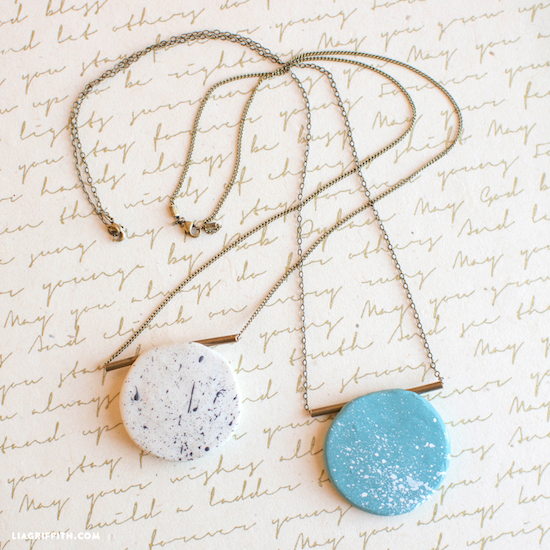
Source: Lia Griffith
This is also an easy and fun project to work on, perfect for beginners! Polymer clay is a type of clay where it hardens after you baked it at a certain temperature. It is inexpensive, versatile and easy to use. It can be combined with other jewelry supplies easily including wire, metal, resin, fibers and wood which makes gorgeous jewelry design. However there are a few techniques you need to tackle with when using polymer clay.
1. Conditioning
Polymer clay need to be conditioned to soften the clay which makes it a lot easier to work with. Condition the clay by kneading it with hands and flatten it with a rolling pin, folding as well as rerolling it in a repeated manner. Add heat using a hair dryer or maybe heat lamp to relax the clay which makes it much easier to condition. Another alternative is to fold and pass it through a pasta machine several rounds.
2. Colour mixing
One of the attractive characteristic of the polymer clay is actually its color. It is available in a wide selection of colors and allows you to form and obtain a limitless number of designs and varieties. Add the polymer clay colors using the exact same manner you condition the clay. Just combine 2 or more colours in your hands and proceed with the conditioning process to blend until you achieve your preferred impact or color (such as marbling).
3. Forming and Shaping
This is where all the fun and creativity begins. You are able to carve, ruffle it, weave it, mold it, texture it, stamp it or anything you could think of! Ceramic tiles as well as wax paper are perfect surfaces to work with polymer clay.
Materials and tools you need:
- Polymer clay
- Acrylic paint
- paint brush
- clasp
- small jump rings (2)
- 3mm copper bead / 3mm copper tubing
- 2mm thick chain (about 22 inches long)
- wire cutters
- needle nose pliers
- jar / rolling pin
Steps:
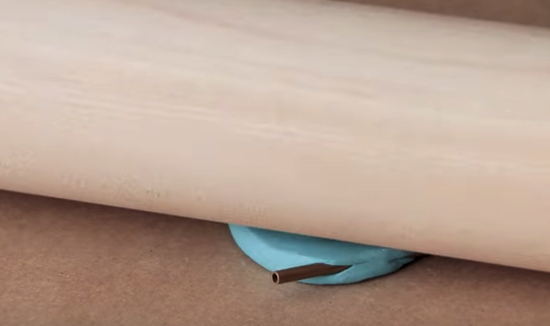
1. Create a 1/8 inch thick circle of clay with a rolling pin or jar.
2. Take the copper needle and gently push it into the clay lengthways.
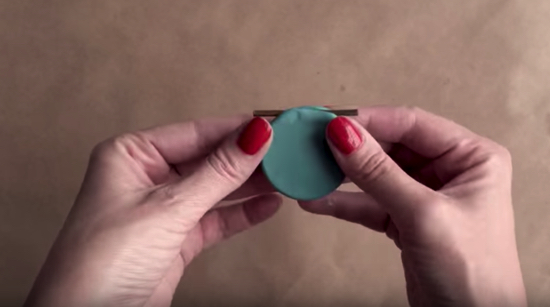
3. Lessen and smoothen any bumps and edges in the face of the necklace with your fingers and rolling pin.
4. Bake the necklace at 225F for 15 minutes or according to the packet instructions.
5. Using a tape, cover the copper needle ends.
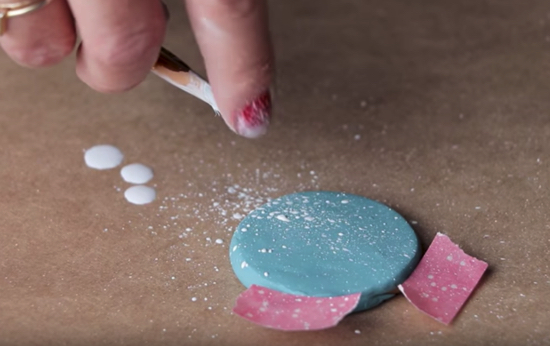
6. Combine a little water and acrylic paint to create a milky consistency.
7. Dip the brush into the paint and flick the brush tip with your finger to splatter the paint across the face of the necklace. You can try this out on paper first if you would prefer to.
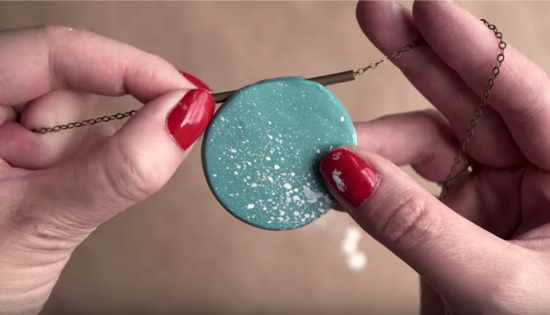
8. Thread the chain through the copper noodle to half way.
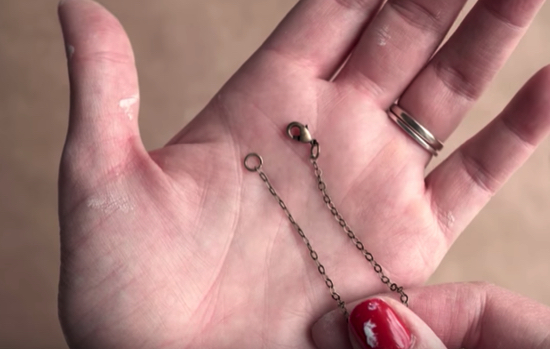
9. Attach the clasp to one of the jump rings then attach the jump ring to the chain. Attach the second jump ring to the other end of the chain.
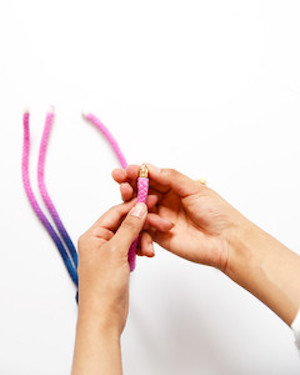
3. Statement Braided Beaded Necklace
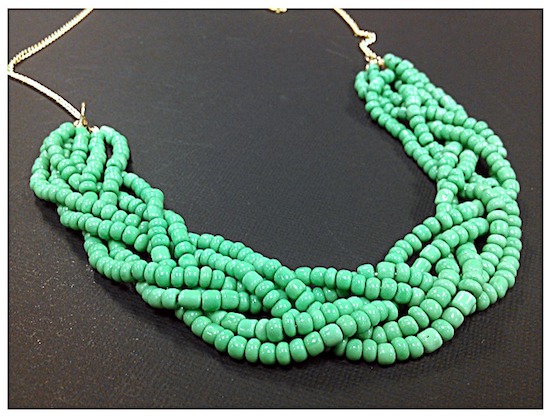
Source: Consumer Crafts
Jump into these statement-looking breaded necklace if you have not tried making them. They may look sophisticated with a retro twist, however to make it, it is not as complicated as it looks. For this you would need to acquire the beading and stringing skills.
Be creative and feel free to personalize this particular bead necklace with beads in different sizes and colours. You can also create the chain shorter or perhaps longer based on the personal preference of yours. Or better yet - create several bead necklaces with multi colours!
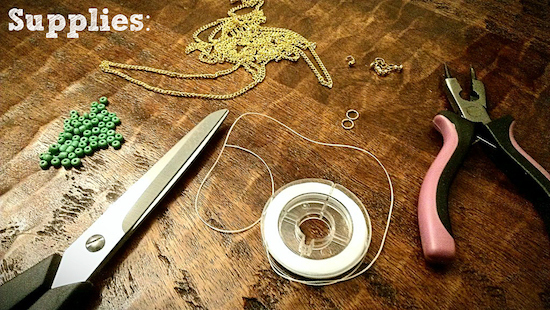
Materials and tools you need:
- small loop gold chain
- glass E beads 6/0 in Green (2 packs)
- 3mm double cup connectors gold
- 7mm Gold jump rings
- white bead thread
- 3-in-1 combination too
Steps:
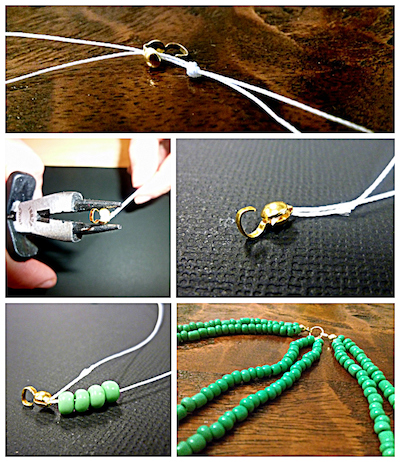
1. Cut 6 strands of white bead thread with each having twelve inches in length. Make a double/triple knot at one end of the two pieces of thread and connect a double cup connector. String seed beads until a length of about ten in for that two strands. Knot and secure with another double cup connector. With the same step, finish off with the rest of the string. In the end, you will get three sets of double strands.
2. Connect the three sets of double beaded locks to a jump ring with the double cup connector and secure it. Keep the three sets of double beaded hair separated, and begin braiding them together. (Tape one end to a table, it will help with extra stability.) Finish the braid by connecting one more jump ring at the other end.
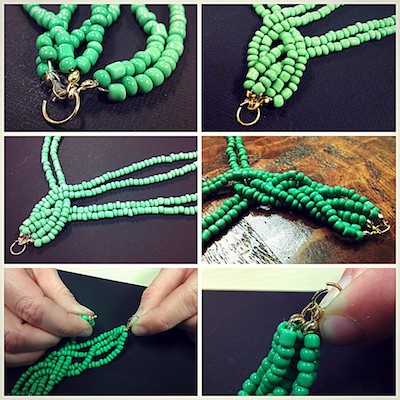
3. Cut the gold chain to twenty inches in length. Connect each end on the jump rings on each side of the braid.
4. And that's it!
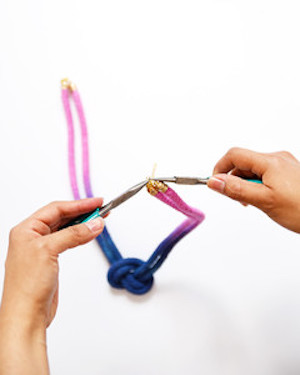
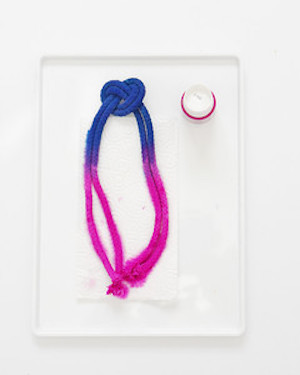
4. Dip-Dyed Knotted Rope Necklace
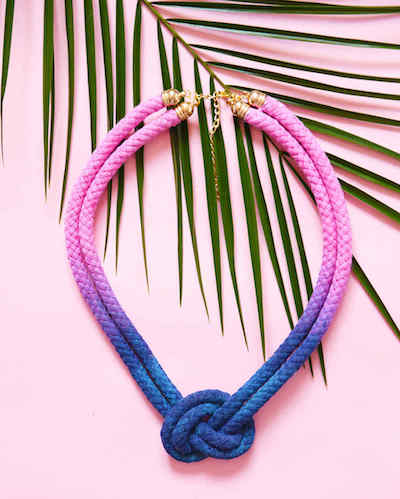
Source: Martha Stewart
Here is another cool and statement necklace to explore. Extremely eye-catching and unique. Have fun with the ombre effect with the dip dye technique and the type of knot.
Materials you need:
- rope
- liquid dye in 2 colours
- pliers
- scissors
- superglue
- tape
- necklace hardware (lobster claw, link chain, jump rings, end caps)
Steps:
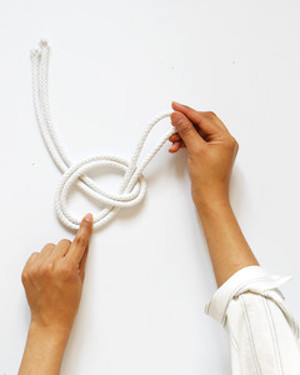
1. Cut one strand of twenty seven inches of rope. Fold it in half and put one side of the rope to the other setting up a loop. Next, insert that very same end from below the loop and extend out to produce a knot all the while keeping the knot's place right in the center.
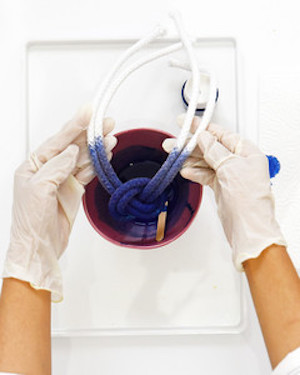
2. According to the instruction of the package, prepare a bowl of blue dye. Dip the knot into the color and allow it to soak in the dye bath until it reaches nearly half the length. Remove the rope from within 5 minutes and lay it on a few pieces of paper towels to get rid of excess.
3. Next prepare the pink dye. Invert the rope and dip the opposite end into the pink dye bath. (Tip: It is alright in case the colors slightly blend, as this causes an all natural ombre look.)
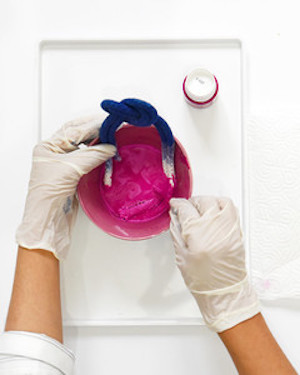
4. Pat the colored rope down with a paper towel and allow it to dry out for no less than a day. (Tip: To quicken the dry time, use a hair dryer.)
5. Cut out the fringe of the ropes as well as conceal them with tape (this can make it a lot easier to place the end caps).

6. Apply glue to the rope endings of yours and place the end caps. Ensure the ropes are of the very same length.
7. Put together a link of 3 with jump rings all for each side. And connect it with the end caps to join them collectively. On one side, connect the link chain as well as on the other, attach the lobster claw.